Skycow.US Minecraft: Difference between revisions
Updated servers |
m Update servers |
||
| (36 intermediate revisions by the same user not shown) | |||
| Line 1: | Line 1: | ||
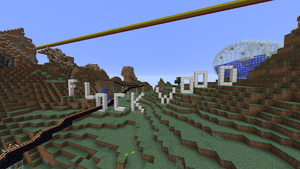
[[File:Mcscreenshot.png|thumb|right|"Flockwood" in Skycow.US Minecraft 1.11]] | [[File:Mcscreenshot.png|thumb|right|"Flockwood" in Skycow.US Minecraft 1.11]] | ||
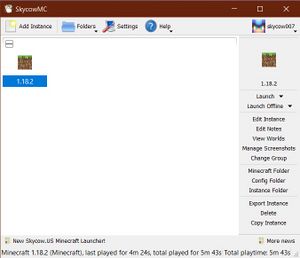
Skycow.US Minecraft is a | [[File:Newlauncher.jpg|thumb|right|The Skycow.US Minecraft launcher]] | ||
Skycow.US Minecraft is a custom version of Minecraft that uses different user accounts. This was originally set up to keep random trolls off of the /f/lockdraw MC server. It also lets folks who don't want to buy the whole game play on Skycow.US specific servers for free. | |||
=Getting a Skycow.US Minecraft | =Getting a Skycow.US Minecraft Account= | ||
To use Skycow.US Minecraft, you'll need an account. This is completely separate from | To use Skycow.US Minecraft, you'll need an account. This is completely separate from the username and password you use if you own regular Minecraft, and has to be created through an invite. Right now, there's no way to get an invite besides asking Admin on /f/lockdraw or by email at admin at skycow dot us. | ||
Once you have the invite link you can choose a username and password for Skycow.US Minecraft. For clarity it's probably best to use the same name you go by on /f/lockdraw, but it's up to you. Invite links can only be used once and you'll have to ask Admin if you need to change your username or password later. | Once you have the invite link you can choose a username and password for Skycow.US Minecraft. For clarity it's probably best to use the same name you go by on /f/lockdraw, but it's up to you. Invite links can only be used once and you'll have to ask Admin if you need to change your username or password later. | ||
=Setting up the Launcher= | |||
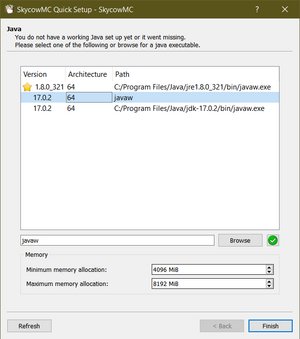
[[File:Launcher-setup.png|thumb|right|The launcher setup screen]] | |||
After you've got your account set up, you can [https://mc.skycow.us/download download the laucher] to run Skycow.US Minecraft on your computer. Like regular Minecraft it requires Java to run, so make sure you have a recent version. The latest versions of Minecraft (1.21 and later) require Java 21 or later (1.18-1.20 require Java 17+). You can download Java 21 from Skycow.US [https://mc.skycow.us/download/jdk-21_windows-x64_bin.exe at this link] or from [https://www.oracle.com/java/technologies/downloads/ Oracle's website]. | |||
You can save the launcher ".zip" file anywhere. Open it and drag the "SkycowMC" folder somewhere you can get to it easily. Then run SkycowMC.exe to open the launcher. When you first start the launcher it shows a list of Java installations detected on your computer. If you don't see anything in the list, you may need to download Java (see above). Choose a Java version (preferably Java 17 or later) from the list. You can also set the minimum and maximum memory (RAM) that Minecraft is allowed to use. It's a good idea to increase this from the default 512MB-1GB to perhaps 2GB-4GB or even more if your computer has a lot of RAM (see the screenshot at right). Once this is done, click the Finish button. | |||
Now you'll see the launcher main window, which is empty right now because you haven't set up any versions of Minecraft to use. First, click Profiles in the upper right and then Manage Accounts. Click Add Skycow.US to log in. As mentioned above, this is different from your the regular Minecraft username and password you might have if you own the normal game. Once your account is added, click Close and you should see your account listed in the upper-right corner. Then, you can click Add Instance to add a version of Minecraft to play. You can add as many versions (or copies of the same version) as you want, and they will keep separate settings, world save files, and mods. | |||
If you just want to play vanilla (un-modded) Minecraft that's all you need to do. Double-click on a Minecraft version you've added to the main window to launch the game. The first time you play a given version it will have to download all the game files (around 500MB-1GB) which might take a few minutes depending on your Internet connection. | |||
= | =Multiplayer Servers= | ||
Like regular Minecraft, Skycow.US Minecraft supports online multiplayer. Note however that you won't be able to play on normal Minecraft servers with your Skycow.US Minecraft account. For that you would need to buy the regular version of Minecraft and use Microsoft's launcher. Regular Minecraft users also can't play on Skycow.US Minecraft servers (which is largely the point of this modded launcher) so Skycow.US hosts some multiplayer servers. Below is a list of server addresses you can add in the "Multiplayer" option on Skycow.US Minecraft to play with other /f/lockdraw users: | |||
{| class="wikitable" | {| class="wikitable" | ||
|- | |- | ||
| Line 56: | Line 30: | ||
| <span style="color:gray">Just the authentication server, no maps hosted here anymore!</span> | | <span style="color:gray">Just the authentication server, no maps hosted here anymore!</span> | ||
|- | |- | ||
! scope="row"| mc1.skycow.us | ! scope="row"| <span>mc1.skycow.us</span> | ||
| 1.21 | |||
| <span> | | <span>Survival Server</span> | ||
|- | |- | ||
! scope="row"| mc2.skycow.us | ! scope="row"| <span style="color:gray">mc2.skycow.us</span> | ||
| | |||
| <span | | <span style="color:gray">Currently offline</span> | ||
|- | |- | ||
! scope="row"| mc3.skycow.us | ! scope="row"| <span style="color:gray">mc3.skycow.us</span> | ||
| | | | ||
| <span style="color:gray">Currently offline</span> | | <span style="color:gray">Currently offline</span> | ||
|- | |- | ||
! scope="row"| mc4.skycow.us | ! scope="row"| <span style="color:gray">mc4.skycow.us</span> | ||
| | |||
| <span style="color:gray">Currently offline</span> | |||
|- | |||
! scope="row"| <span style="color:gray">mc5.skycow.us</span> | |||
| | | | ||
| <span style="color:gray">Currently offline</span> | | <span style="color:gray">Currently offline</span> | ||
|} | |} | ||
= | =Playing Modded Minecraft= | ||
After getting a bit bored with normal "vanilla" Minecraft, you might want to play on servers with mods that add items and capabilities to the game. Below is a list of modpacks you can use to play on Skycow.US servers. To add them to the launcher, click on "Add Instance" on the main screen then choose "Import from zip" on the left side, paste the appropriate link to the modpack in and click "Add". This will ensure you're using the exact same list of mods that each server uses. | |||
'''Note that many modpacks require you to use the older Java 8 to run correctly because Forge does not yet support Java 17+.''' You will need to right-click the instance for the modpack, click "Edit Instance", go to "Settings" on the left side and check "Java Installation" then click "Auto-detect..." and choose a Java 8 version for such packs to load correctly. While you're there, you can also check "Memory" and give the modpack a bit more RAM if your computer has any to spare. Modpacks can require 4+ GB of RAM. | |||
{| class="wikitable" | |||
|- | |||
! scope="col"| Modpack | |||
! scope="col"| Java Version | |||
! scope="col"| Link for "Import from zip" menu | |||
|- | |||
! scope="row"| <span>FTB OceanBlock</span> | |||
| <span>Java 1.8</span> | |||
| <span>https://mc.skycow.us/modpacks/sc-oceanblock.zip</span> | |||
|} | |||
=Changing Your Player Skin= | |||
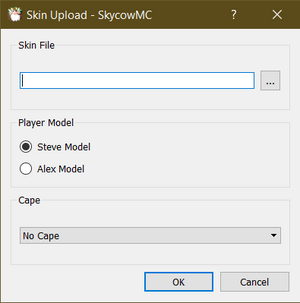
[[File:Skin-upload.png|thumb|right|The skin upload window in the launcher]] | |||
In newer versions of the Skycow.US Minecraft launcher you can change your own player skin, which determines what your character looks like to other players on multiplayer servers or if you look at yourself in third-person using F5 in game. | |||
Many Minecraft skins can be found on [https://www.minecraftskins.com/ MinecraftSkins.com] or other sites, and there are also tools available online to design and preview your own custom skin. Much more information can be found [https://minecraft.fandom.com/wiki/Skin on the Minecraft wiki]. | |||
Once you have the .png image of a skin you wish to use on Skycow.US Minecraft, go to the Accounts page in Settings and click on the username for which you want to change the skin. Then click Upload Skin on the right side. Choose the .png file of the skin you want by clicking the three dots button next to the blank box, then choose whether the skin should use the "Steve" or "Alex" model (Alex has thinner arms) and click OK. If you want to remove your custom skin and be the default "Steve" character again, click Delete Skin on the right side. | |||
Revision as of 17:59, 18 June 2024


Skycow.US Minecraft is a custom version of Minecraft that uses different user accounts. This was originally set up to keep random trolls off of the /f/lockdraw MC server. It also lets folks who don't want to buy the whole game play on Skycow.US specific servers for free.
Getting a Skycow.US Minecraft Account
To use Skycow.US Minecraft, you'll need an account. This is completely separate from the username and password you use if you own regular Minecraft, and has to be created through an invite. Right now, there's no way to get an invite besides asking Admin on /f/lockdraw or by email at admin at skycow dot us.
Once you have the invite link you can choose a username and password for Skycow.US Minecraft. For clarity it's probably best to use the same name you go by on /f/lockdraw, but it's up to you. Invite links can only be used once and you'll have to ask Admin if you need to change your username or password later.
Setting up the Launcher

After you've got your account set up, you can download the laucher to run Skycow.US Minecraft on your computer. Like regular Minecraft it requires Java to run, so make sure you have a recent version. The latest versions of Minecraft (1.21 and later) require Java 21 or later (1.18-1.20 require Java 17+). You can download Java 21 from Skycow.US at this link or from Oracle's website.
You can save the launcher ".zip" file anywhere. Open it and drag the "SkycowMC" folder somewhere you can get to it easily. Then run SkycowMC.exe to open the launcher. When you first start the launcher it shows a list of Java installations detected on your computer. If you don't see anything in the list, you may need to download Java (see above). Choose a Java version (preferably Java 17 or later) from the list. You can also set the minimum and maximum memory (RAM) that Minecraft is allowed to use. It's a good idea to increase this from the default 512MB-1GB to perhaps 2GB-4GB or even more if your computer has a lot of RAM (see the screenshot at right). Once this is done, click the Finish button.
Now you'll see the launcher main window, which is empty right now because you haven't set up any versions of Minecraft to use. First, click Profiles in the upper right and then Manage Accounts. Click Add Skycow.US to log in. As mentioned above, this is different from your the regular Minecraft username and password you might have if you own the normal game. Once your account is added, click Close and you should see your account listed in the upper-right corner. Then, you can click Add Instance to add a version of Minecraft to play. You can add as many versions (or copies of the same version) as you want, and they will keep separate settings, world save files, and mods.
If you just want to play vanilla (un-modded) Minecraft that's all you need to do. Double-click on a Minecraft version you've added to the main window to launch the game. The first time you play a given version it will have to download all the game files (around 500MB-1GB) which might take a few minutes depending on your Internet connection.
Multiplayer Servers
Like regular Minecraft, Skycow.US Minecraft supports online multiplayer. Note however that you won't be able to play on normal Minecraft servers with your Skycow.US Minecraft account. For that you would need to buy the regular version of Minecraft and use Microsoft's launcher. Regular Minecraft users also can't play on Skycow.US Minecraft servers (which is largely the point of this modded launcher) so Skycow.US hosts some multiplayer servers. Below is a list of server addresses you can add in the "Multiplayer" option on Skycow.US Minecraft to play with other /f/lockdraw users:
| Address | MC Version | Description |
|---|---|---|
| mc.skycow.us | Just the authentication server, no maps hosted here anymore! | |
| mc1.skycow.us | 1.21 | Survival Server |
| mc2.skycow.us | Currently offline | |
| mc3.skycow.us | Currently offline | |
| mc4.skycow.us | Currently offline | |
| mc5.skycow.us | Currently offline |
Playing Modded Minecraft
After getting a bit bored with normal "vanilla" Minecraft, you might want to play on servers with mods that add items and capabilities to the game. Below is a list of modpacks you can use to play on Skycow.US servers. To add them to the launcher, click on "Add Instance" on the main screen then choose "Import from zip" on the left side, paste the appropriate link to the modpack in and click "Add". This will ensure you're using the exact same list of mods that each server uses.
Note that many modpacks require you to use the older Java 8 to run correctly because Forge does not yet support Java 17+. You will need to right-click the instance for the modpack, click "Edit Instance", go to "Settings" on the left side and check "Java Installation" then click "Auto-detect..." and choose a Java 8 version for such packs to load correctly. While you're there, you can also check "Memory" and give the modpack a bit more RAM if your computer has any to spare. Modpacks can require 4+ GB of RAM.
| Modpack | Java Version | Link for "Import from zip" menu |
|---|---|---|
| FTB OceanBlock | Java 1.8 | https://mc.skycow.us/modpacks/sc-oceanblock.zip |
Changing Your Player Skin

In newer versions of the Skycow.US Minecraft launcher you can change your own player skin, which determines what your character looks like to other players on multiplayer servers or if you look at yourself in third-person using F5 in game.
Many Minecraft skins can be found on MinecraftSkins.com or other sites, and there are also tools available online to design and preview your own custom skin. Much more information can be found on the Minecraft wiki.
Once you have the .png image of a skin you wish to use on Skycow.US Minecraft, go to the Accounts page in Settings and click on the username for which you want to change the skin. Then click Upload Skin on the right side. Choose the .png file of the skin you want by clicking the three dots button next to the blank box, then choose whether the skin should use the "Steve" or "Alex" model (Alex has thinner arms) and click OK. If you want to remove your custom skin and be the default "Steve" character again, click Delete Skin on the right side.